***this review is rife with spoilers
If you're looking to set up a secret society, you need a few things. First, an evil mastermind to head things up. Then, a millionaire convert to bankroll the enterprise. Also, plenty of slavish zealots willing to die for the cause. And last and most certainly least, the resident dufus, the Pinky to your Brain, the bumbling fool whose enthusiasm for the cause is a perpetual embarrassment to you, who coughs up your most carefully guarded secrets and farts during your most sinister rituals. You try to keep him out of the way by giving him a menial job in the catacombs, but you know he's always there, the weak link, ready to bring your whole organization down.
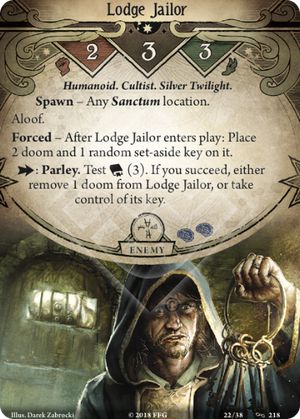
Behold, the Pinky of the Silver Twilight Lodge. I love him. If you manage this chucklehead right, he'll fetch you two, maybe even three of the keys you need. That's because every time he spawns, he has a new key on him! And fortunately for you, there are ways to keep him coming back again and again and again.
1) Once per game, you can be guaranteed to find Igor (he seems like an Igor) patrolling the Holding Cells. You know this is actually just where the Lodge keeps spare robes and incense, but to keep this dumbass out of the way, they told him the rooms are full of horrible monsters, and that it's up to him to make sure they don't get out! At any rate, my first order of business in any playthrough is to grab the Cellar key and head down to the Holding Cell in order to find out what super important Lodge artifact Igor has accidentally stumbled across.
2) The encounter deck has several cards that may let you recur Igor -- two copies of Mysterious Chanting and two copies of Call to Order. It's hit or miss, but if you have a choice, I recommend pulling him. Of the two, Call to Order is more reliable -- just make sure Igor is the only cultist you're knocking off. Then, enjoy the ensuing farce: Carl Sanford: "Gather, my brethren, as we usher in the new order, as we shed the limits of our primitive humanity and embrace godhood!" Igor, panting and sweaty: "Here I am boss." Carl: "Godammit..."
3) There are player cards that can keep Igor in circulation as well. Persuasion is a good one: it clears Igor's doom, snags his key, and shuffles him back in the deck all for one action -- but you do have to pass an 5 test. My favorite, though, is Dumb Luck. This card let's you filch one key off Igor, and then bring him back the very next turn with a new one. "Meddling wascals -- you took my key of bone! I was going to tell you about the onyx coin in my pocket but now I won't..."
In short, if you've been desperately racing the doom clock in most of your playthroughs, trekking up to the Vault and down to the Inner Sanctum in search of keys, consider an Igor run instead. And then go here to see his modern reincarnation: www.youtube.com