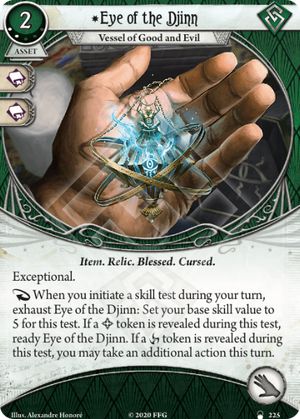
Try and Try Again

Try and Try Again works at ST.6, so it don't work with Take Heart or Predestined working at ST.7. However, Try and Try Again works with skill cards working at ST.2. You could commit Unrelenting to draw 2 cards and return it. You could commit Signum Crucis to add and return it. Try and Try Again don't require any slot unlike Grisly Totem. You don't need to pay additional 3xp for Relic Hunter. Eventually, Try and Try Again can be utilized for fail-based deck.

2 Drawing Thin + Grisly Totem + Take Heart + Try and Try Again + Unrelenting + Rabbit's Foot (+ Relic Hunter) 5 cards + 6 resources. Stella will be very happy with 10xp (or 16xp if taboo).

elkeinkrad · 520
Can you point to the rule? It seems weird to do the "after" of T&TA before the "if" of Take Heart. — Timlagor · 7
@Timlagor // You can check the detail of this ruling from one of the Take Heart review; check https://arkhamdb.com/card/04201#review-945 — elkeinkrad · 520
I think this is the most non-intuitive ruling in AHLCG. When you check the order of timing "during test", you should firstly find which step is related. This is because the strange timing is generated. — elkeinkrad · 520
Even the FAQ says this in sec — AlexBlume · 1
(2.2) Timing of “At…” or “If…” abilities Some abilities have triggering conditions that use the words “at” or “if ” instead of specifying “when” or “after,” such as “at the end of the round,” or “if the Ghoul Priest is defeated.” These abilities trigger in between any “when…” abilities and any “after…” abilities with the same triggering condition. — AlexBlume · 1
So if "if" cards happen in ST.7. how the heck does TATA which says "after" happen in ST.6.?? — AlexBlume · 1
Nevermind what I said before, the Arkham FAQ specifically addresses this in section 1.7: (1.7) Skill Test Results and Advanced Timing During Step 7 of Skill Test Timing (“Apply skill test results”), all of the effects of the successful skill test are determined and resolved, one at a time. This includes the effects of the test itself (such as the clue discovered while investigating, or the damage dealt during an attack), as well as any “If this test is successful…” effects from card abilities or skill cards committed to the test. <Reaction Triggered Ability symbol> or Forced abilities with a triggering condition dependent upon the skill test being successful or unsuccessful (such as “After you successfully investigate,” or “After you fail a skill test by 2 or more”) do not trigger at this time. These abilities are triggered during Step 6, “Determine success/failure of skill test.” — AlexBlume · 1
Anna Kaslow

I suppose part of the value of Anna might be for the specific campaign she belongs to. For those who choose to accept their fate (which is the Anna path anyway), Anna in the opening hand can eliminate the risk of The Tower • XVI by having that be the tarot you search and play. Even Anna drawn after opening hand but early in the scenario can be a cheaper way to get the Tower on the table and also protect another tarot you might already have out. To me this seems the best use for her - picking her up along with Charisma if you chose the "accept your fate" path. If you kill her off you can discard the bad tarot and keep a good one.

The trick of course being to get Anna in your opening hand and not the Tower as well. Calling in Favors could be used if you have other allies in the deck to let you keep whichever ally you start with and swap for Anna quickly.

Time4Tiddy · 254
If you have Anna in the opening hand and the Tower, you can still search for another tarot and play it. Then play the Tower, paying it's cost and discard it, when you kill off or "calling in favor" with Anna. Anna just protects your other Tarot from discarding, if you get it into play before the Tower. I agree in general, if you have the Tower as weakness and whant to get another Tarot, I would also get Anna. Otherwise, there is always the risk, that you get a good Tarot into the starting hand, play it for free and soon have to discard it, when you have to play the Tower. — Susumu · 386
Strange Solution

4 xp to spend 5 actions healing 8 dmg.

...

At the time of writing this review, out of all the versions, this is the only Strange Solution that includes the rules clarification that says:

"No refunds."

This tells you everything you need to know.

Sorry, and better luck next time you try to use Shrewd Analysis.

HanoverFist · 782
Actually it is not that bad because you can later trade your strange solution for a 5XP card — el_kloklo · 1
There’s no 5xp Strange Solution for you to trade up to. — Sojourne · 97
Ancient Covenant

This is the card that is going to open Extreme mode to the masses (like me). It greatly improves the math of the bag. Let me show how!

You have yourself a standard Extreme bag, as follows: 0, -1, -1, -2, -2, -3, -3, -4, -4, -5, -6, -8, , , , , , , . Obviously the special tokens will vary, but let's say for argument's sake that the and are -3, and the and are -4. That actually seems somewhat generous!

Here are your odds of passing checks. The first number is with the plain bag, the second is with 5 's, and the third is with 5 's AND Ancient Covenant.

Even: 11% / 16% / 29%

Up one: 21% / 29% / 38%

Up two: 32% / 42% / 46%

Up three: 58% / 64% / 67%

Up four: 79% / 81% / 83%

What's the takeaway? If you are already well up on a test (say a +4), Ancient Covenant gives you a bit of cushion but not much. You'll probably pass anyway, and if you draw a , you're even more likely to pass, because by then you're +6. But if you're starting up just one? Even after that pull, there's still plenty that can sink you. Ancient Covenant gives you a fighting chance at checks that in Extreme mode are usually long shots.

BUT WAIT THERE'S MORE!!!

Sacred Covenant also helps you keep more 's in the bag. How? By cutting down on the frequency with which you draw multiple 's in one check.

BUT WAIT THERE'S SO MUCH MORE!!!!

This may be jumping the gun a little bit, but there's a new card coming out in the Lair of Dagon called Favor of the Sun (not yet up on arkhamdb but announced by FF). That card allows you to seal three bless tokens and draw them during any check instead of something from the bag. Combined with Ancient Covenant, that effect is INSANELY powerful, especially on higher difficulties. It allows you to auto-succeed in the most scandalous way. You can be two DOWN on a check, and pass it without modifying it a bit. How good is that? Let's see:

Pnakotic Manuscripts allows you to avoid pulling tokens on three tests, guaranteeing success as long as you're skill value is even with the difficulty. It costs 5xp, 5 resources, and takes up a hand slot. It also costs an action to play and an additional action every time you use it, unless the test was during a revelation effect.

Favor of the Sun + Ancient Covenant also guarantees success on three tests, but you can be down as much as two. The combo costs 3xp, 2 resources, and takes up no slot at all. And it costs no actions, not even to play, because for some reason Favor of the Sun is fast!

This combo opens up a lot of new strategies for Extreme mode. Of course, Favor of the Sun is max two cards, so you'll want to use other Extreme strats as well: automatic clues and damage whenever possible, fail-forward options. But now you don't have to fear checks quite so much. A card like Pilfer, which seems crazy to run when there's a -6 and a -8 waiting for you, now could have a spot in your deck.

So, if you've been eyeing Extreme mode for a while but haven't had the courage to take the plunge, come on in: the water's warm!

Physical Training

This is still seen a lot in beginner decks, so I thought I'll write an updated review (and because the existing pros and cons review is kind of misleading).

You should almost never take Physical Training (0). Not even as deck slot filler, unless you have nothing but the core set (in which case you might not have any other deck slot fillers).

This card (and this class of cards in general) is among the most inefficient cards in the game. By standard action-economy analysis, this costs 4 "actions" to play: 2 resource, a card, and a play action. That's a large investment for a card that you need to burn even more resources on to get any benefit out of. If you don't use it a lot, you just spent 4 "actions" for very little benefit. If you use it a lot, you'll find yourself short of resources to play actually useful allies weapons and events.

By the time you gained a +3 boost from Physical Training, you have just paid for a Leo De Luca in a class that isn't especially known for being flush for resources, and have gotten far less benefit.

The + could have come from an ally or weapon you could have played if you hadn't spent resources playing and boosting with Physical Training. The horror damage you reduced by boosting could have been soaked by the same ally. Or the same boosts could have been gotten by committing cards that you drew using the tempo you gained by not playing Physical Training (+1 skill boost ~= 1 card committed ~= 1 resource anyway!).

If your 0xp deck is flush enough in resources to take Physical Training, it is a sign that you've over-invested in resources for your deck, or should take the chance to throw some Dynamites.

The upgrades don't have this problem because they have a much lower upfront cost (and synergy with Well Prepared).

suika · 9584
A one of card that can spend resources is more useful than it sounds, it is very easy to have one or two games with a deck where you simply can't turn your resources into progress, no matter what the situation is physical training will give you that progress, sometimes dynamite is in hand when you need soak, or an ally is in hand when you need to avoid AoO. and almost all assets have a cost of 3+ "actions" and there is certainly worse than a slotless comitable card. — Zerogrim · 303
This is great for P skids with O Back. He has too many resources. This pushes his fight and saves him from treacheries like rotting remains or frozen in fear. — Django · 5242
@Zerogrim difference being that nearly all other assets provide some form of benefit without needing you to spend even more resources — or if they do need you to spend resources/cards, they have much higher rates of return on those resources. And physical training won't help you if you need soak or need to avoid an AoO either, so I don't quite get your point (also nearly every card is committable so). Physical Training also practically never translates into progress by itself unless there's a Will parley somewhere, in which case you should have bought Fine Clothes instead. — suika · 9584
@Django 1) skids fighting with Fist isn't very effective in the first place 2) skids has much better resource sinks and/or well-connected 3) skids can soak the horror from rotting remains, and after a bit of XP he has much better options against Frozen in Fear and will treacheries — suika · 9584
suika I definitely agree that this suite of level 0 cards are simply not worth taking, except for one exception: a beginner Preston deck. He's simply got the cash to make those costs irrelevant but may need help with a head test every once in a while. That being said, even this advantage I've found to be niche as I usually am spending my 5 resources a turn on something else, and thus willing to take whatever the encounter deck wants to give me. But there are a few of those truly nasty cards (frozen in fear) that you just have to pass, and Preston doesnt have a plethora of cards with head icons to rely on. I haven't played with the super upgraded version yet, but I imagine it's simply cream these situations. — jdk5143 · 99
@jdk5143 Dig Deep is a great Preston card yeah. The analysis is different for Dig Deep and Scrapper as well since those are in the class with Dark Horse access. — suika · 9584
The problem with the "there are other cards that offer boosts" is that those cards often compete for slots. So a "slotless boost card" can provide more flexibility. — LivefromBenefitSt · 1104
@Live the more relevant comparison would be using skill cards for boosting, since PT boosts are per test only. Skill cards are pretty much better every time than playing and boosting via Physical Training — or even random cards with Will and Combat icons. — suika · 9584
Well, except PT can be used repeatedly (depending on resources) which is like other assets but not like (most) skills. I think PT is particularly weak because of traditional Guardian resource economy problems. — LivefromBenefitSt · 1104
Resource boosters are fine in decks that generate plenty of resources. Something like Dig Deep in Preston or PT in Jenny can do a lot of work. I think saying PT costs you 4 actions ignores that 1. You start the game with 5 resources and cards, and 2. That many classes have more efficient ways of gaining those things. A resource isn’t really worth one action unless you’re taking the resource action, which most people tend to avoid. — StyxTBeuford · 13100
@Styx: it's an analysis of opportunity cost, resources you're spending on PT could have been spent on other assets, instead of PT you could have drawn another asset. — suika · 9584
And this specifically applies to PT, not other boosters like the composures, or even Scrapper/Keen eye. PT is subpar even on Jenny. — suika · 9584